How to fit a backpack: Your handy checklist
Here's how to properly fit and adjust your hiking backpack to ensure comfort and even weight distribution


Backpacks are vital for exploring the outdoors, carrying everything from a snack to survival gear. You can have the best hiking backpack around, but if it's not fitted properly it'll be uncomfortable and can even cause injury. In this article, we run through the features you need to look for in a great backpack, and how to adjust it to fit you.
Just like other outdoor equipment, different backpacks are used for different things. More hardcore hiking options will include internal or external frames in order to distribute weight properly, while everyday backpacks and basic outdoor day sacks might just have shoulder straps. We are going to focus on backpacks that have waist and shoulder straps, and a frame that distributes weight across them. This allows you to spread the load through your hips and not just your shoulders, which is vital for carrying heavier loads and in preventing injury.
- Hitting the slopes? These are the best ski backpacks
- Explore the best running backpacks
- Complete your outdoor kit with one of the best waterproof jackets
Around 70% of the load in a rucksack should be carried through the hips, but this will only happen safely and properly if you have a backpack that is adjusted to you. If your backpack is improperly fitted, you will fatigue more quickly and may even suffer an injury. Almost every backpack comes in just one size, which is then adjusted for fit. If you are particularly small, then you might need to purchase a backpack with a smaller volume.
Let's start by looking at the different kinds of straps you'll find on a hiking rucksack.
Backpack straps: A guide
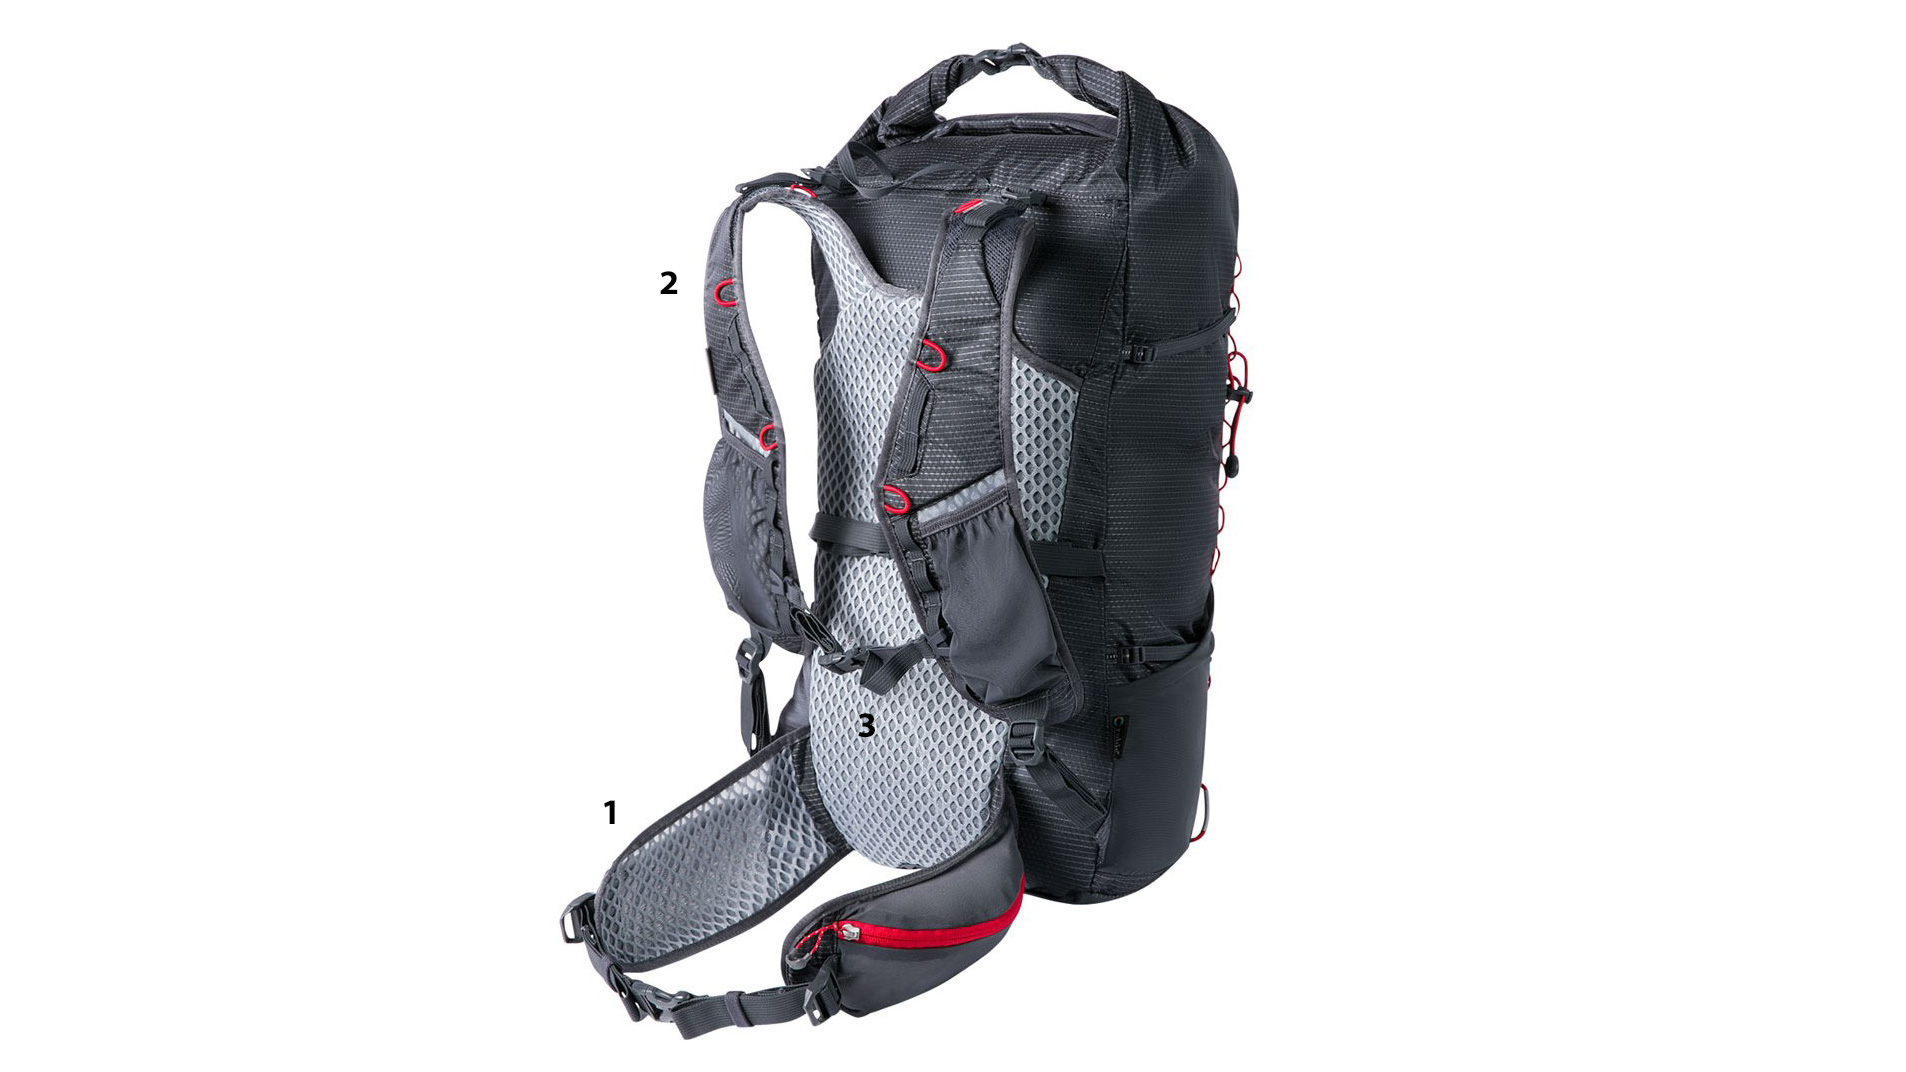
A backpack has a few different straps on it. You need to adjust all of these to fit it to your body shape. The usual straps on a backpack are:

Waist strap [1], shoulder straps [2] and chest strap [3] shown on the excellent Berghaus Fast Hike 32
Waist strap
This is attached to either side, at the bottom of the rucksack, and carries most of the weight of the loaded rucksack. It clips together with a buckle. Some bags have an additional hip-adjustment strap, which pulls the bottom of the rucksack towards the body, stabilising the load and reducing movement when you walk.
Shoulder straps
These loop from the top of the rucksack to the bottom, and carry around 30% of the weight of a loaded rucksack. Most rucksacks also have load-stabilising straps that run from the top of the shoulder strap to the top of the bag. They pull the rucksack closer to your body, stabilising the load, and reducing any movement as you walk.
Get all the latest news, reviews, deals and buying guides on gorgeous tech, home and active products from the T3 experts
Chest strap
The chest strap attaches to the shoulder straps, and clips together over the sternum. It prevents the shoulder straps being pulled apart whilst walking, ensuring that the load is distributed evenly.
Back ladder
Some backpacks allow you to adjust the length between the shoulder and hip straps. This is usually a Velcro system.

How to fit and adjust a backpack
To fit you hiking backpack to your body, start by loosening every strap on the backpack, so that you are starting from a blank slate.
Next, fill your rucksack with around 10 kg of weight (you can use canned food and drinks bottles) to simulate loading. Pad out the pack with clothing, spread the weight evenly, and do not over-stuff the bag. Now it's time to start adjusting the straps.
1. Start with the hip straps
We start with the hips NOT the shoulders. The hips carry the majority of a backpack's weight, and form the foundation of how it sits on your body, so we build the fit from there.
- Locate the top of your hip-bones with your fingers
- Place the weighted backpack on your shoulders, so that it hangs loosely
- Buckle up the hip strap across your hips bones so the top of the hip bone sits between the middle and the top of the strap.
- Gently and evenly tighten the straps; the buckle should sit below your belly button
You're looking for a fit that's firm, but not so tight that the straps dig in or become uncomfortable.
2. Adjust the shoulder straps
Now, keep the hip-strap buckled-up whilst you move on to the shoulder straps. Pull these evenly, so they follow the curve of your shoulder to the front. Don't make them too tight, as most of the weight should be in your hips anyway – and if you make them too tight, they will pull into your armpits.
3. Adjust the back ladder
If your rucksack has a back ladder, now's the time to look at that. Your shoulder straps should come away from your rucksack around your shoulder blade. If they are too loose, shorten the back of your rucksack.
This requires trial and error, because you cannot do this whilst wearing the pack. When adjusted correctly, there will NOT be a gap between your shoulder blades.
4. Tighten the chest strap
Adjust the chest strap up or down. It should attach to the shoulder straps around the bottom of your armpit. This does not need to be tight – it should be just enough to prevent your shoulder straps drifting outwards.
5. Adjust the load stabilising straps
The shoulder stabilising straps should be at about 30 degrees from vertical. This pulls the backpack slightly towards your body, and stops the weight of the backpack from tipping you backwards. Do not over-tighten, or the pack will rub against your shoulders.
If your backpack has hip stabilising straps, look at these now too. In a similar way, they are designed to pull the bottom of the backpack towards your body. Do not over-tighten, or it will restrict your movement.
Rucksack fit checklist
Now your backpack is fully adjusted, it's time to make the following final checks:
- Do not let your rucksack sit too high – the weight of anything that sits above your shoulder height will be carried through your shoulders
- Ask someone to tug at the hip straps whilst you are wearing the pack; you should move with it
- Ask someone to move the shoulder straps apart (without the chest strap done up); they should move, but with some resistance
More outdoors guides on T3.com:
- Browse the best binoculars around
- We've tried and tested the best hiking boots
- Explore the skies (from your spare room) with one of the best telescopes
- The best cheap action camera to capture your adventure

Ash Bhardwaj is a writer, film-maker and podcaster, who tells unfamiliar stories about familiar places. He travels for adventure, history and current affairs – often involving long, uncomfortable walks. Ash hosts The First Mile, an immersive travel podcast.