How to set up and connect a VPN on your iPad
Get to grips with your new VPN with our step-by-step guide on how to set up and connect on your Apple iPad


So you’ve waded through the onslaught of advice and found the best VPN, but now you’re facing the potentially daunting prospect of not only installing it on your chosen device, but also navigating how exactly to use it.
Thankfully a fairly straightforward task, we’re going to take you through a helpful step-by-step guide on how to install a VPN straight on to your Apple iPad. It’s worth noting there is a more direct way to install a VPN on your iPad, but we’ll be taking you through the way that benefits you and your wallet the most.
In our ‘how to’ guide, we’ll be using ExpressVPN as our model, as we deem it not only the best overarching VPN, but also the best iPad VPN for Apple tablet users specifically. That said, regardless of which VPN made it through the hunger games of virtual private network wars, when it comes to iPads, you can pretty much guarantee the installation process will be the same, whether you’re looking to install ExpressVPN, NordVPN, Private Internet Access, or another provider altogether. So let’s get started…
ExpressVPN - Get 3 additional months free with 1 year plans
The top performer when it came to speed, security features, and the ability to unlock our favorite streaming services, ExpressVPN reigns supreme as the best overall VPN, as well as for iPads. Complete with a 30-day money back guarantee, new customers can also enjoy three months added to their one year plan, saving you 49%.
Where should I buy my VPN from?
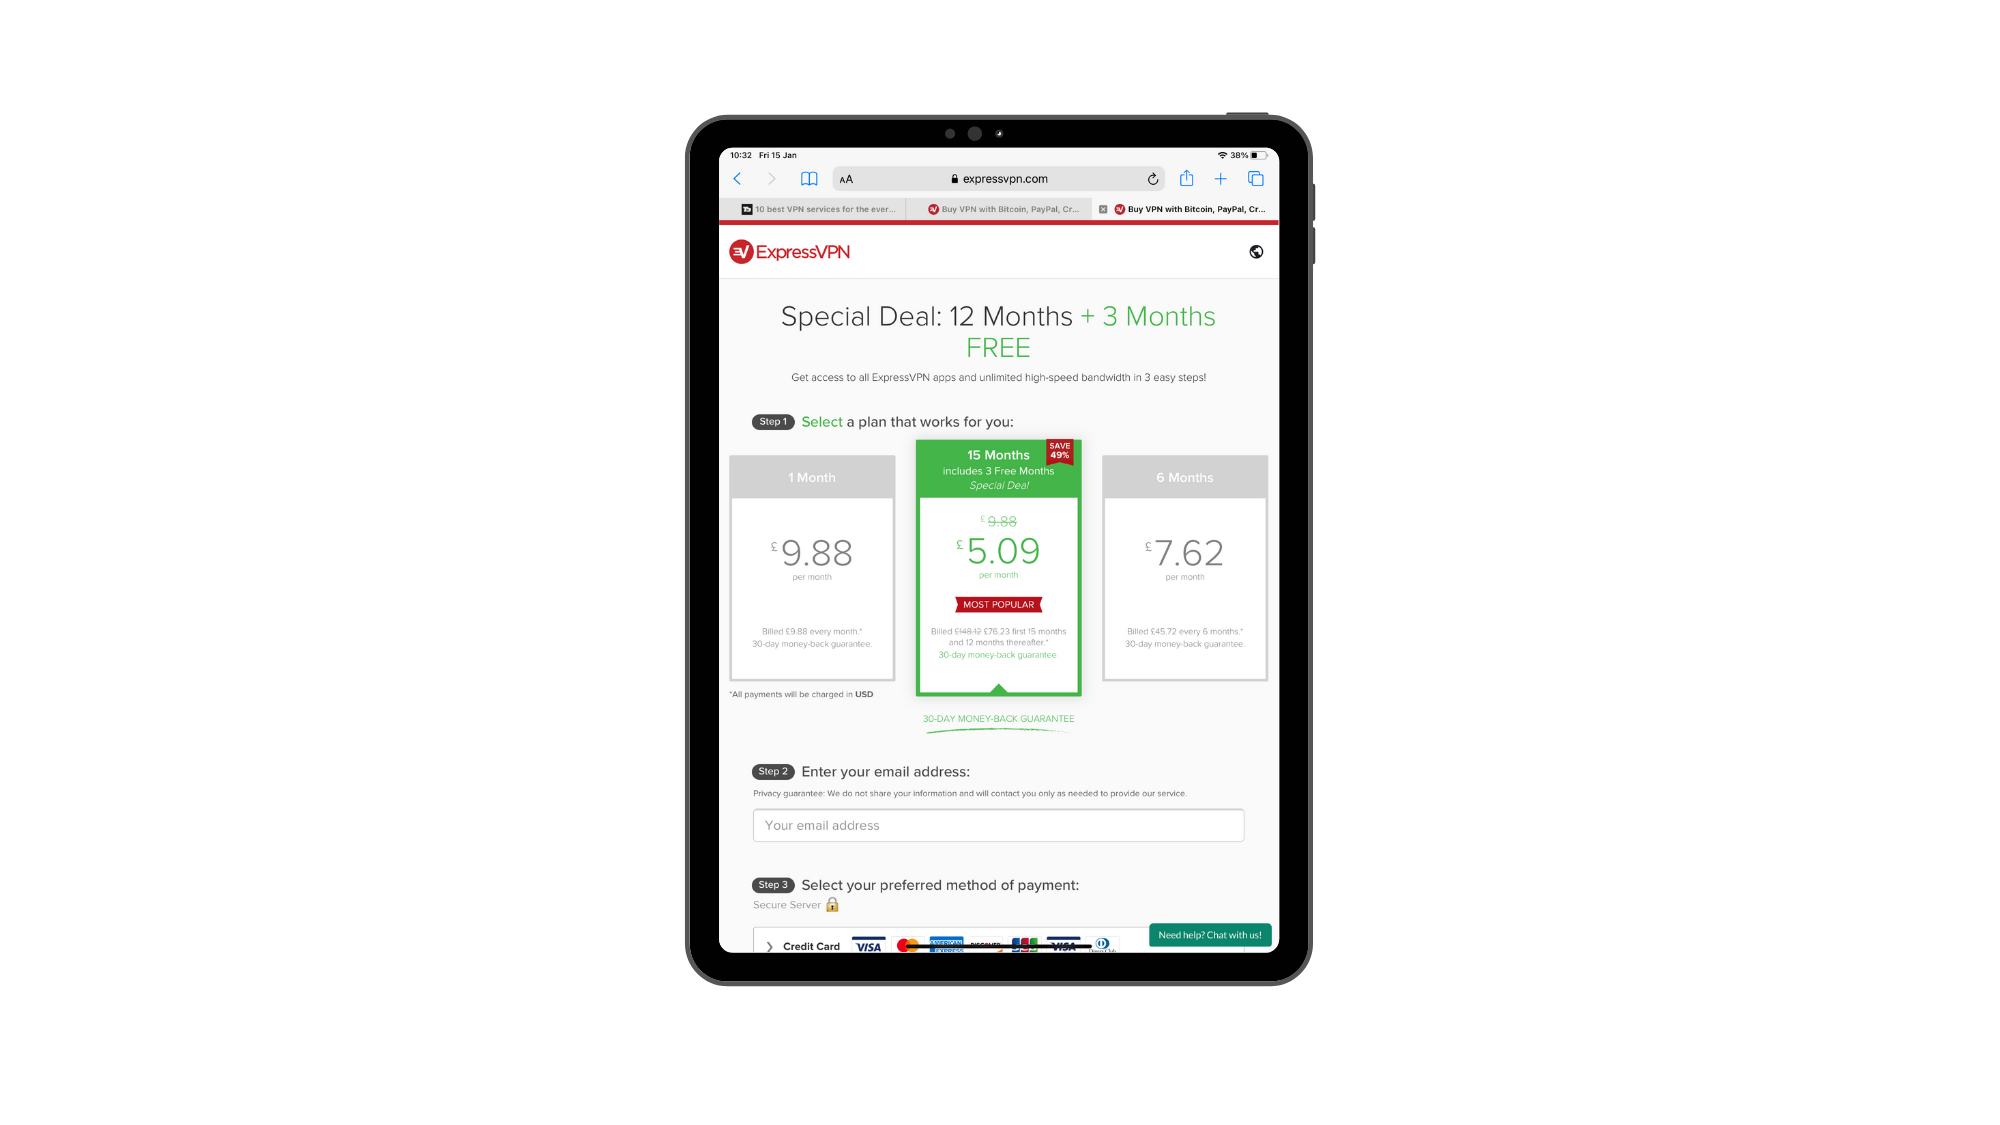
While your first port of call might be to launch the App Store, it can be more beneficial to go directly to your provider to purchase your VPN subscription. Going straight to the App Store means the chance of missing out on the latest VPN deals. In this instance, subscribing to a VPN package directly with ExpressVPN gets you an additional three months for free when choosing the provider's 1-year plan. Better still, while there is the lure of a 7-day free trial via the App store, all customers benefit from a 30-day money back guarantee regardless of where you download your iPad client from.
Choose the payment plan you want. Typically VPN providers offer a monthly and annual plan, as well as two and three year packages, where you can secure a better monthly average when you lock in for longer, as well as those additional free month benefits.
How to install the VPN onto my iPad
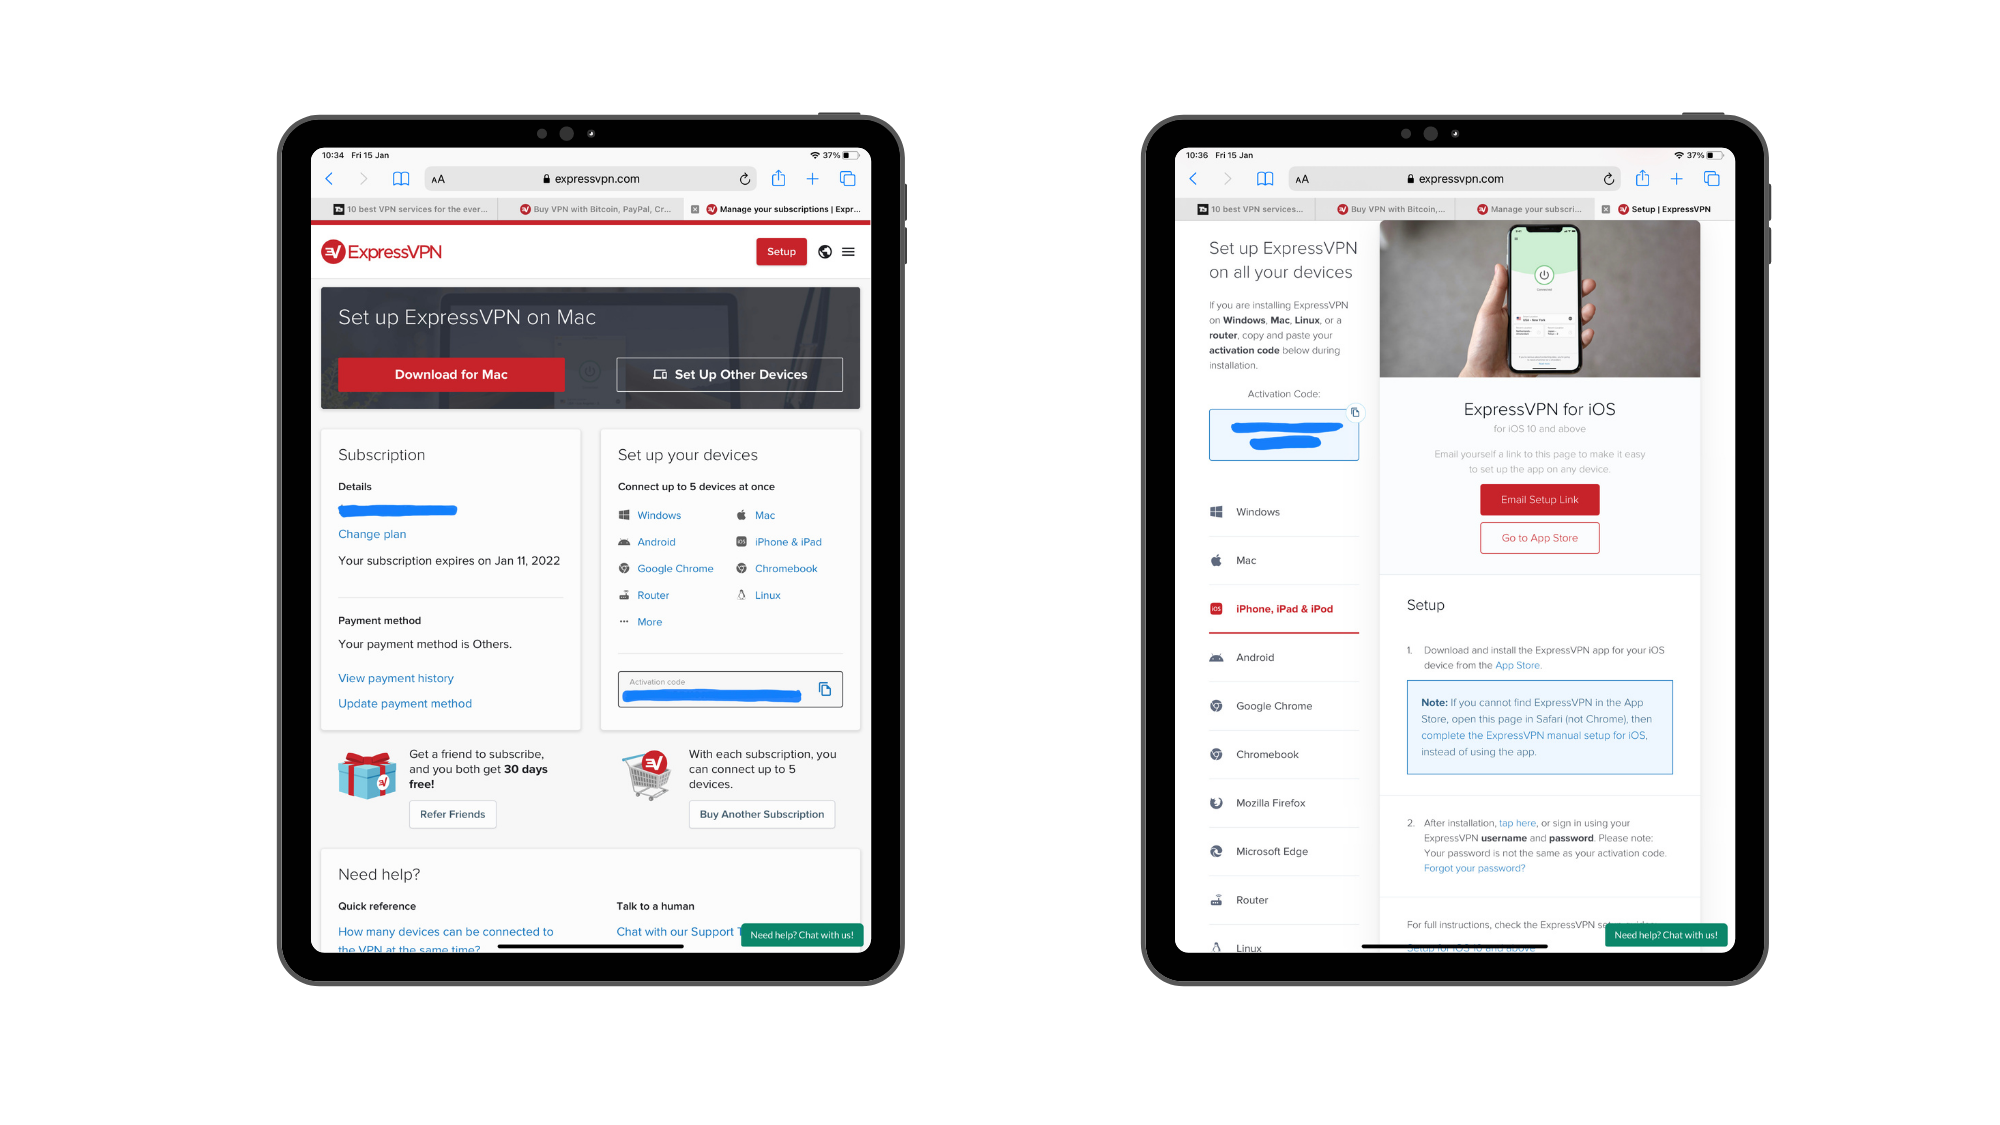
With ExpressVPN, once you’ve subscribed, it will then pull up a handy list of devices that you can pick from to install ExpressVPN on. Tapping on iPhone & iPad will take you to further instructions, breaking down how to install the software onto your device.
You can choose to visit the App Store or follow the link on Safari to manually configure your VPN. This allows you to connect to your chosen server straight from Settings on your iPad rather than entering a VPN app. There are pros and cons to both, with many preferring a more punchy app to work through. However, if you don't want apps clogging up the place, this may be an ideal step for you, though it's worth noting an app can give you more features like ExpressVPN's auto-connect component.
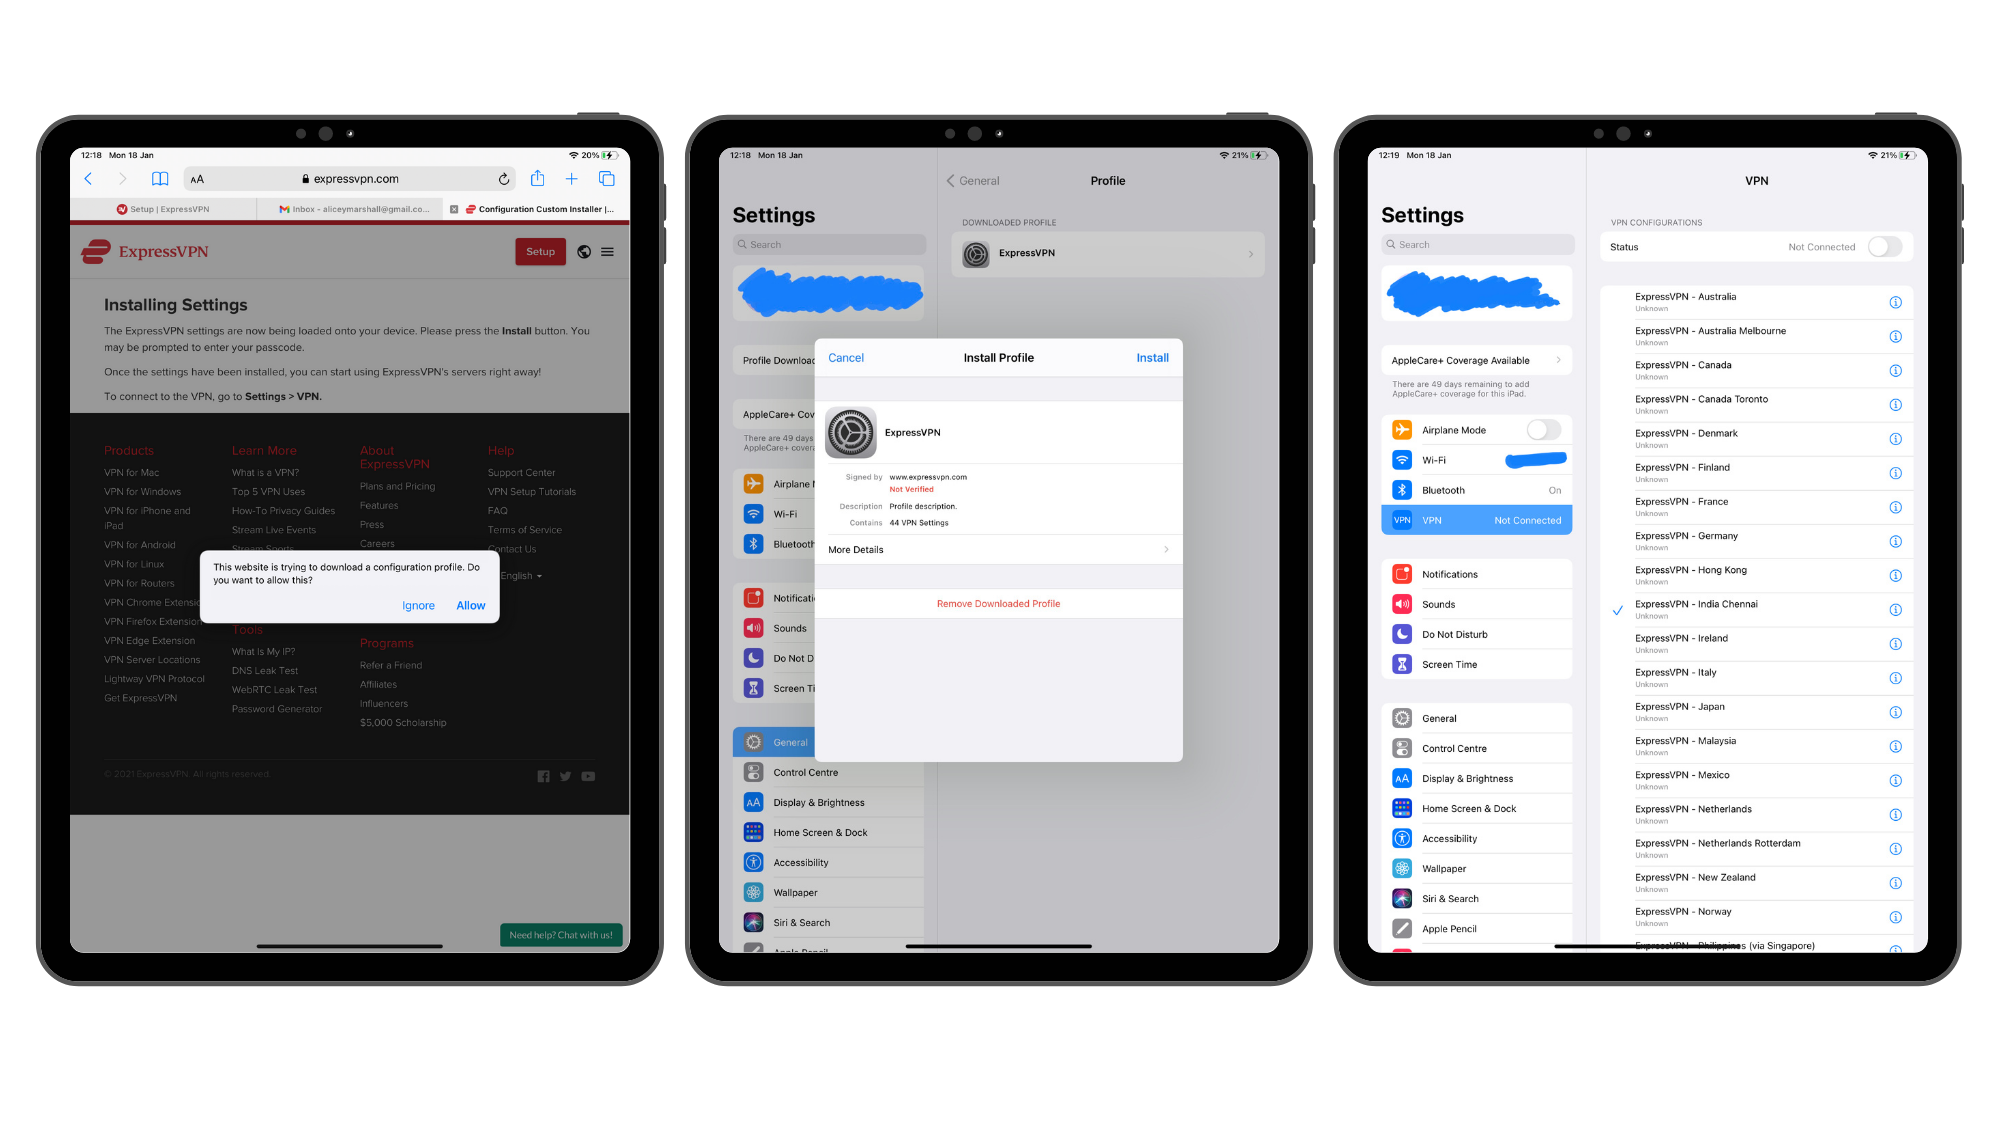
Open the Safari link and you will be prompted to allow the ExpressVPN to download a configuration profile. Once this is done, you'll then be told to visit your Settings.
When opening Settings, Profile Downloaded will be sat on the left-hand side beneath your iCloud account at the top. Tap this and the ExpressVPN profile will appear. From here you can install the profile. Beware a warning message will flag up, which states the use of the VPN. Whilst it does sound a little scary, it is essentially describing the very means you'll be wanting a VPN for on your iPad, allowing you to shift between various servers and keep your device more secure.
Once the installation is complete, you'll see a list of servers you can connect to across a range of countries.
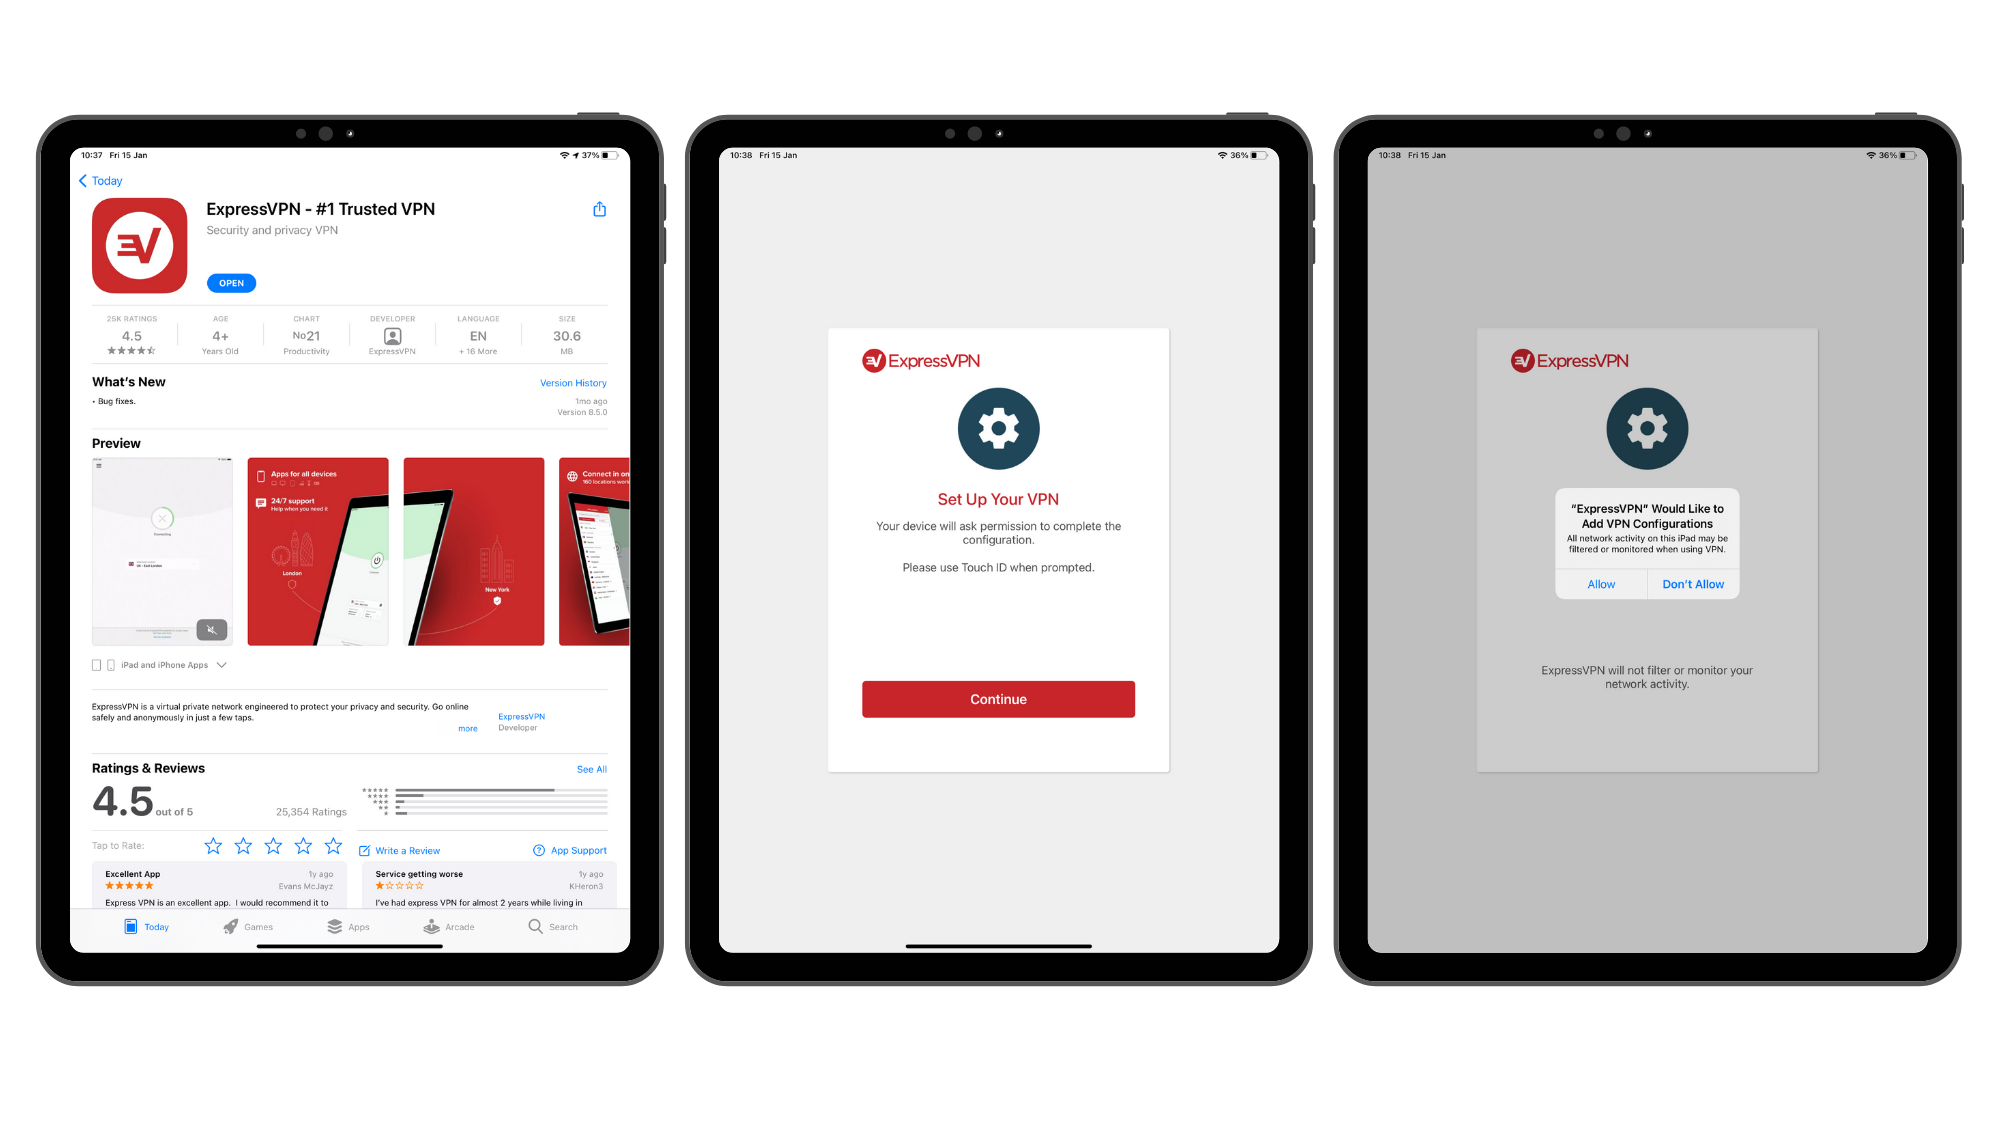
For those who wish to download the ExpressVPN app, visit the App Store and search ExpressVPN. Download as you normally would and launch the app. You'll then enter the login details you chose when signing up for your subscription and may be prompted to authorise your device with ExpressVPN emailing you a code you'll need to enter.
Much like with the manual set-up, it'll ask you to proceed with configuration, taking you to your settings. Here, depending on how you unlock your device - whether passcode, Touch or Face ID - you will do either of these three things to allow the configuration to proceed.
Once that is set up, going back to your app you can choose to allow push notifications. These are useful to know when you are and aren't connected to a server, so we'd certainly recommend turning notifications on. At this point, you'll also be asked to help improve ExpressVPN by sharing crash reports, etc. You can either tap 'OK' or 'No Thanks' here.
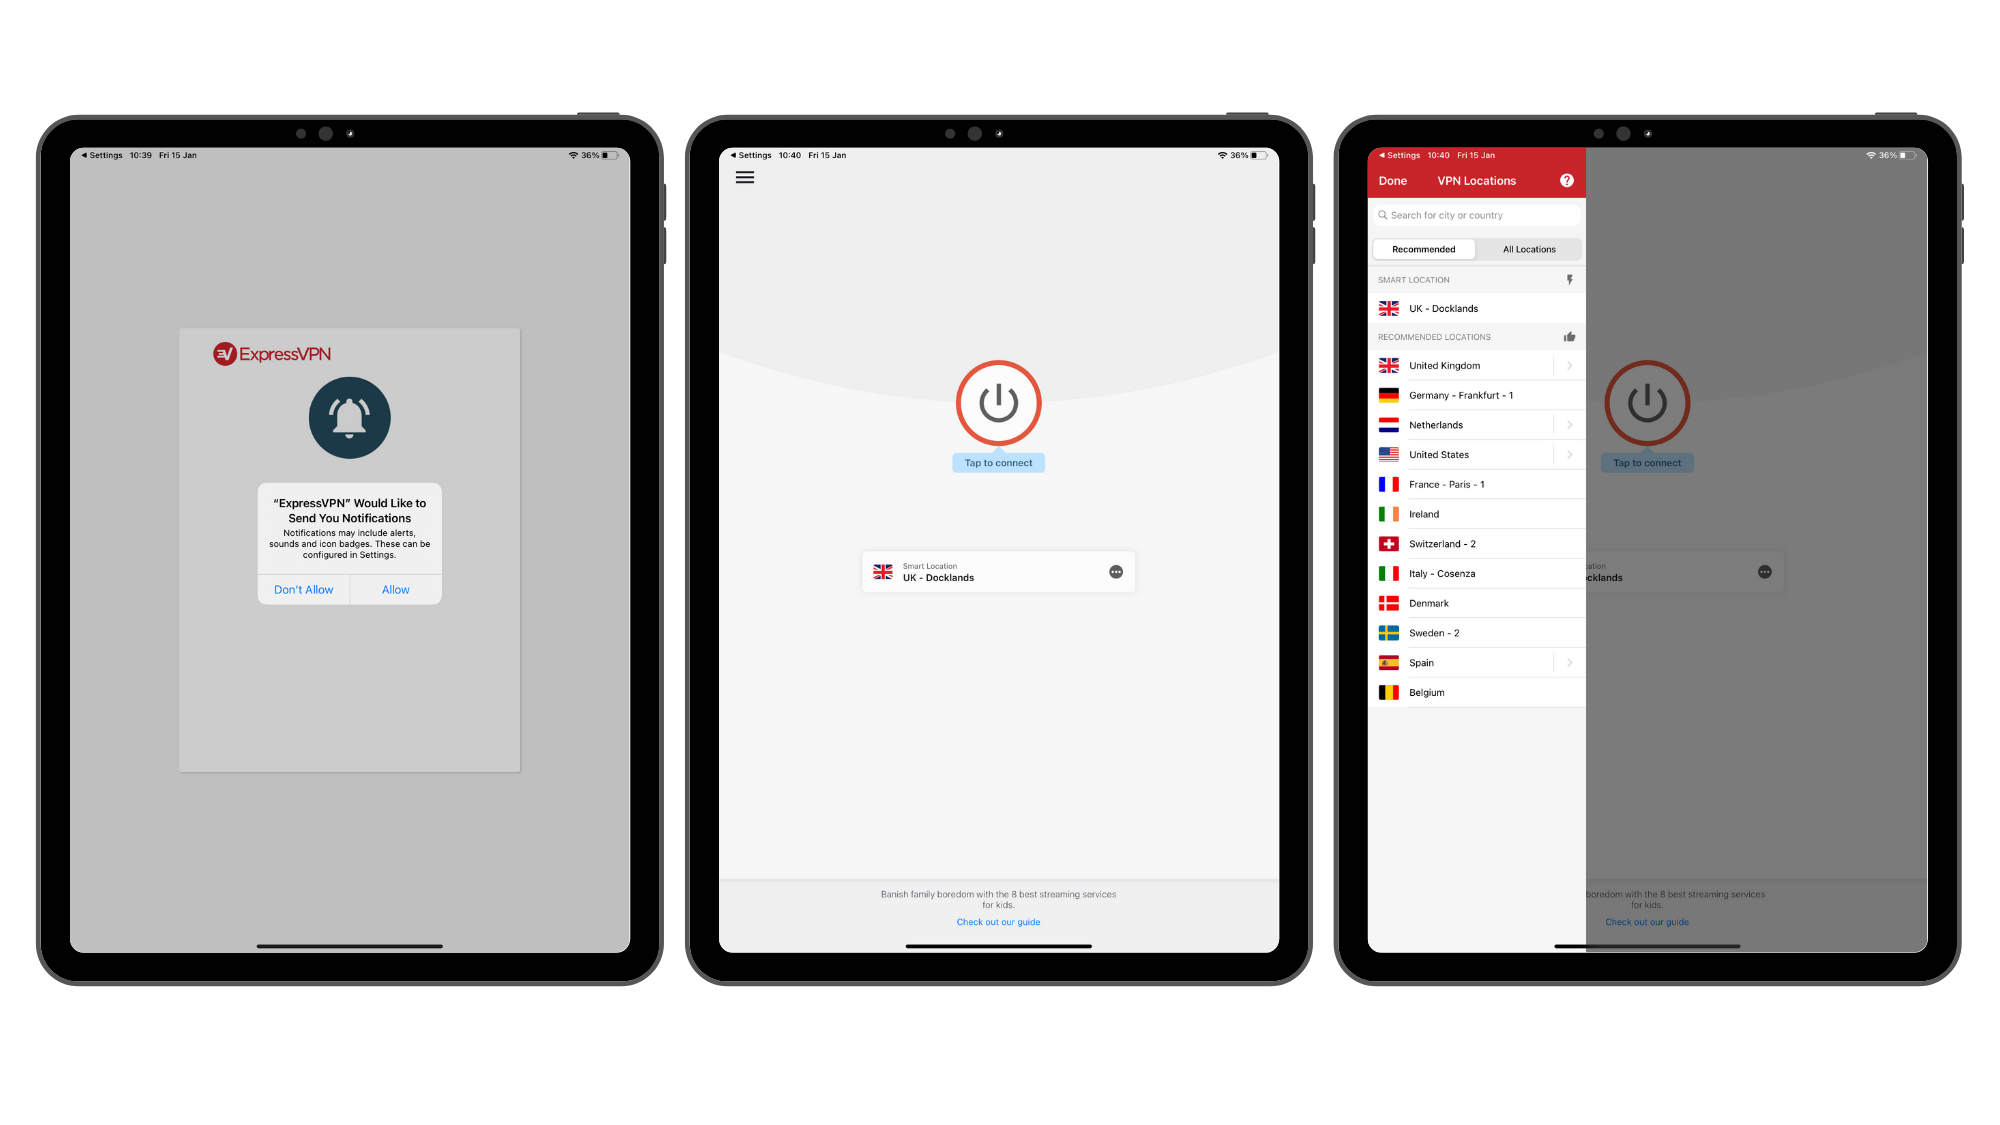
After that you're all set-up. It's then time to explore the app. You can see all the available countries by pressing on the '...' below the big 'Tap to Connect' button and it'll pull up more servers. Pressing the hamburger button in the top left corner brings up settings where you can explore features like Auto-connect and choose VPN protocol depending on if you're after security over speed, etc.
You'll also find Help & Support, showcasing a bunch of handy articles to better explain how to use the app and all its functions.
- Discover which is the best Mac VPN with our handy guide
- Equip your smart TV with the best Samsung VPN
- Unsure what the fuss is all about? Here's why you should use a VPN on your phone
Get all the latest news, reviews, deals and buying guides on gorgeous tech, home and active products from the T3 experts

Alice is eCommerce Editor at Future, with a focus on streaming services such as Disney Plus, Hulu, and HBO Max, as well as VPN. Nowadays she looks after and writes guides and how to watch articles across TechRadar and CinemaBlend. Previously a Commercial Content Writer for Trusted Reviews, Alice has worked in the eCommerce space for over five years and over two years writing about consumer tech.
