Smart light switch installation tips: what you need to know
Smart light switches are an easy way to smarten up your room, but here's what you should know about how they're installed
The best smart light switches are designed to either connect to your existing smart bulbs to make controlling them even more convenient, or to replace your existing light switches so that you can control ordinary bulbs with your phone or smart speaker as well as good ol'-fashioned switch. And some of them do both.
If you want some help on making the choice between the different types of smart lighting switches or how to install a smart light switch, this guide is for you.
To wire or not to wire
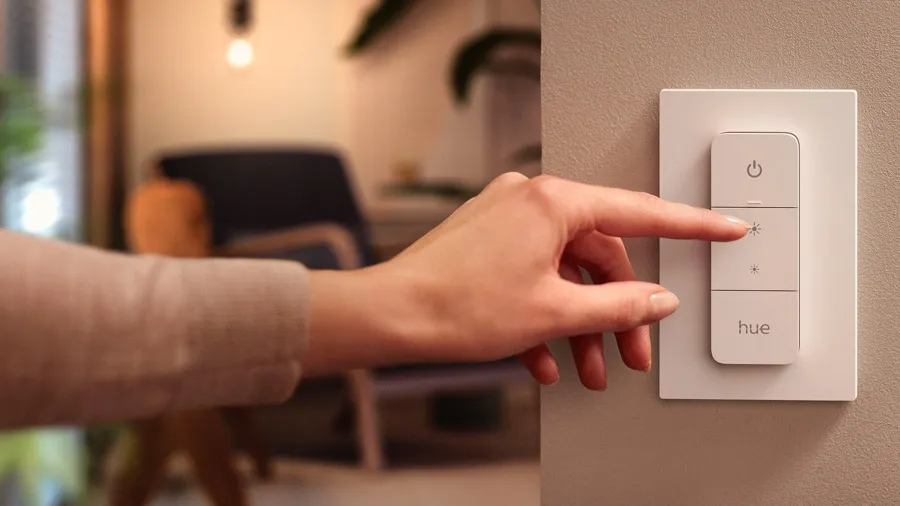
Smart switches come in two flavours: wired ones, that replace existing wired light switches, and wireless ones that can go anywhere. A good example of the latter is the Philips Hue Dimmer Switch V2, which comes in a plastic frame you can mount to the wall (with just adhesive strips, if you like), but can be unclipped to use as a remote control. Probably the least switch-like smart switch of all is the Nanoleaf Remote, which is designed to control Nanoleaf decorative lighting as well as Apple HomeKit scenes: it looks like something you’d expect to roll in a game of Dungeons & Dragons.
Installing a wire-free switch is simple: stick some batteries in it and follow the instructions to add it to your network or pair it with your smart home hub or bridge. And that’s it.
The key benefit of wire-free smart switches is that they can go anywhere provided they stay within communication range of your lighting setup; the key downside if you don't mount it on the wall is that, like any remote, you might spend more time trying to remember where you left it than actually using it.
You don’t have that issue for wired switches, which don’t move. But they present a few issues too.

Wireless switches such as the Nanoleaf Remote can go anywhere within range of your router or hub.
What to do before you install a wired smart light switch
Before you buy your switch, turn off the appropriate lighting circuit at your breaker – don’t skip this step – and unscrew the facing of the switch you want to replace. Now take a peek behind it. You need to know two things: how much space there is for the back of your switch, and what wires you have.
Lighting circuits in the UK are either two- or three-wire circuits, and if they were installed after 2006 they’re colour coded with green & yellow for the earth wire and brown for the live wire. If you also have a neutral wire, that’s blue. In older UK installations the live wire is red and the neutral is black, and if they’re really old then the earth wire is solid green.
Do you need a neutral wire for a smart light switch?
If you want to have a wired smart switch, you’ll need a neutral wire to connect it to, or you’ll find yourself shopping from a very small selection of switches that don’t work as well as their neutral-connected friends.
The reason a neutral wire is necessary for many smart light switches is because a neutral wire maintains the circuit even when the switch is set to off – so the switch still has electricity flowing through it.
With a standard light switch, flicking it to the off position cuts the circuit completely – and that’s okay, because the switch doesn’t have any features requiring any power. When you press it on, electricity flows through it; when you switch it off, it stops.
And that’s fine unless you need your switch to respond to your smartphone app or smart speaker rather than a press of your finger. To do that, your switch needs to be powered on so that it can receive data and execute commands when the lights are off.
Some smart switches can work without a neutral wire, but there’s a compromise: because they need some power to continue operating, they don’t completely cut the circuit. Instead, they restrict the current so there’s enough to keep the switch powered up but not enough to illuminate your bulbs.
The actual installation is really simple: turn off the lighting circuit at your breaker box, unscrew the existing switch and wire its replacement according to the wiring diagram that comes in the box. Then it’s just a matter of screwing it into place, turning the power back on and following the instructions to pair it with the appropriate app.
What you need to know before installing a smart dimmer switch
A standard switch simply toggles lights on and off, but a dimmer can incrementally increase or reduce the amount of power in order to brighten or dim the bulbs. Dimmers don’t work well with non-dimmable bulbs, especially LED ones: you’ll usually find that while a non-dimmable LED bulb will probably work fine when the switch is turned up full, it’ll flicker or buzz on any other setting. It may also overheat, which is something you really don’t want your light bulbs to do.
Dimmer switches are rated for a maximum load. The maximum power you need is the total of all the bulbs the switch will control, so for example if you have six 100W incandescent bulbs you need a switch rated for 600W or higher.
The good news is that if you’ve moved to dimmable LED bulbs, you don’t really need to worry about that unless you’ve got so many bulbs that you can see your bones through your skin when you turn the lights on. A 300W switch that can handle six 50W halogen bulbs can handle 60(!) 5W LEDs.
Need to know: Wi-Fi smart switches
Most wireless-enabled switches only use the 2.4GHz frequency band. It’s pretty old-school as far as wireless is concerned, but it reaches longer distances than 5GHz wireless – and because you’re only sending and receiving tiny amounts of data you don’t need to worry about its relative slowness. But like any Wi-Fi connection there are still range limits, and the range may be shortened if there are lots of obstacles between your router and your switch.
This may affect your choice of where you install a smart switch –, but, generally speaking – if your phone can connect to your Wi-Fi when held at the position you want to install your switch, then the switch should be fine too.
Some smart light switches would prefer to connect to a home hub, so for example Philips’ Hue dimmer gains more powers when it’s connected to a Hue Bridge rather than directly to the bulbs, and the Nanoleaf Remote connects to its hub so that you can use it to switch between HomeKit scenes with other smart devices.
Now you know what to look for and what’s involved in installing it, check out our guide to the best smart light switches in 2021.
