DJI Avata 360 review: The best-value 360 drone right now (if you can handle it)
The Avata 360 shoots amazing footage, but it’s a complex editing journey

The DJI Avata 360 captures immersive 8K 360˚ footage that can be reframed using multiple angles from a single flight, making it an appealing choice for content creators and FPV fans. However, reframing all that footage requires complex post-production and careful editing decisions, which may deter some beginners.
-
+
An affordable entry into 360 videography
-
+
Immersive ultra-wide field of view
-
+
A true FPV experience when using optional goggles
-
+
Compact design for easy transport
-
+
Keen pricing
-
-
Too complex a system for some
-
-
Footage needs to be edited in specialised software
-
-
Editing is very time intensive
Why you can trust T3 Our expert reviewers spend hours testing and comparing products and services so you can choose the best for you. Find out more about how we test.

Are you sitting comfortably on your booty? Welcome to T3’s ridiculously long review of the DJI Avata 360, a sensational but perplexing hybrid do-it-all FPV drone with an omnidirectional camera system that captures the world from a multitude of angles.
Coming hot on the heels of the similar Antigravity A1, the Avata 360 promises to shake up the drone world with its high-speed skyjinx and ability to be flown FPV-style using goggles or conventionally with a standard remote control.
Make no mistake, this is one of the best camera drones on the market right now – and one of the cheapest – but there’s a ton of stuff to unpack here, so bear with me. Are you sitting comftybold two-square on your botty? Then I’ll begin.

DJI Avata 360 review
Price and availability
The DJI Avata 360 is available from select UK online stores with prices starting at £409 for the drone alone to £829 for the Fly More Combo (details below). Your first port of call should be the DJI Store, hotly followed by Amazon and Heliguy, until it becomes available everywhere else.
As of writing, the DJI Avata 360 is not available from official DJI US web stores due to regulatory complications, but who knows what the future holds?
Specifications
- Weight: 455g
- Dimensions: 246×199×55.5 mm (L×W×H)
- Max speed: Normal 27mph (43kmh); Sport 40mph (64kmh)
- Max flight time: 23 mins
- Max flight distance: 8.3 miles (13.5km)
- Wind resistance: Level 5 (24mph)
- Camera sensors: Two 1/1.1-Inch square CMOS sensors
- Max aperture: f/1.9
- Max video resolution: 8K at 60fps
- Max image resolution: 120MP
- Image stabilisation: Single axis mechanical + digital
- Onboard storage: 42GB
- MicroSD card slot: Yes
Available combinations

The DJI Avata 360 is available in four packages. You can purchase the drone on its own (£409) and use it with any compatible controllers you already have, or you can opt for the Avata 360 with DJI RC2 screen-based controller (£639).
If you want to splash more cash, try the popular Fly More Combo (£829) comprising the Avata 360, DJI RC2 controller, three batteries, charging hub and excellent sling bag or, for FPV fans, the exhilarating Motion Fly More Combo (also £829), which comes with the Avata 360, three batteries and charging hub, along with DJI’s latest Goggles N3 and DJI RC Motion 3 hand controller.
In other words, a lot of options to suit a wide variety of pockets and pilots.
Set up
I received the full monty from DJI, comprising the standard Fly More Combo with drone, RC2 controller and spare batteries. I also received DJI’s latest Goggles N3 and DJI RC Motion 3 hand controller.
I have to admit that I was dreading the process of setting them all up at the same time, but after following the basic instructions for all three packages, it miraculously turned out to be much more straightforward than I had envisaged.
Setting up and binding the drone and RC2 controller to your account is very straightforward and involves linking the RC2 controller to your WiFi and following the onscreen steps. However, registering and linking the Goggles N3 and RC Motion 3 controller requires using the DJI Fly app and the included USB-C cable between the phone and the goggles.

I genuinely expected chaos to unfold during this process, but, against all odds, both the goggles and the Motion Controller somehow synced perfectly with the drone, and all was well. Until the slew of firmware updates came pouring in for every item I had on the desktop.
Most people would advise using DJI’s Assistant desktop software for the complex updating process, but I stuck to WiFi, knowing full well how long DJI updates can take to complete using this method.
Since the updating process can take over 40 minutes to complete in some instances and the drone may be sitting in an ‘on’ state on the table, I would advise having a fan blow some cool air over it because, while any drone will cool itself in flight through the simple physics of fast air running over its ventilation intakes, when it’s sat on a table for ages it can easily overheat and switch itself off or turn off some of its settings, and that could affect the updating process.
What’s so great about the DJI Avata 360?

Just like the land-based DJI Osmo 360 and Insta360 X5 cameras T3 has already reviewed, the new DJI Avata 360 is equipped with two opposing vertical fish-eye lenses that record a spherical 360˚ view of everything around the drone, whether it’s ahead, behind, above or below.
In fact, having given this little tyke a few spins, I’m of the opinion that 360˚ videography is way more suited to aerial use than it is on the ground, mostly because hitting the airspace opens a zillion more doors to one’s creativity.
So what’s the point of having a 360˚ drone like the Avata 360 or even the popular Antigravity A1? Post-reframing is the answer.
Where a conventional drone uses a single camera mounted to the nose of the craft and requires the pilot to be creative in the moment, framing from different angles and trying to get the money shot before the drone’s battery runs out of juice, with the Avata 360, you simply fly a similar course or trajectory without much care about actual framing.
This is because the footage that comes out of the Avata 360 doesn’t just cover what’s ahead of the camera, but almost every part of the sphere the drone is flying within.

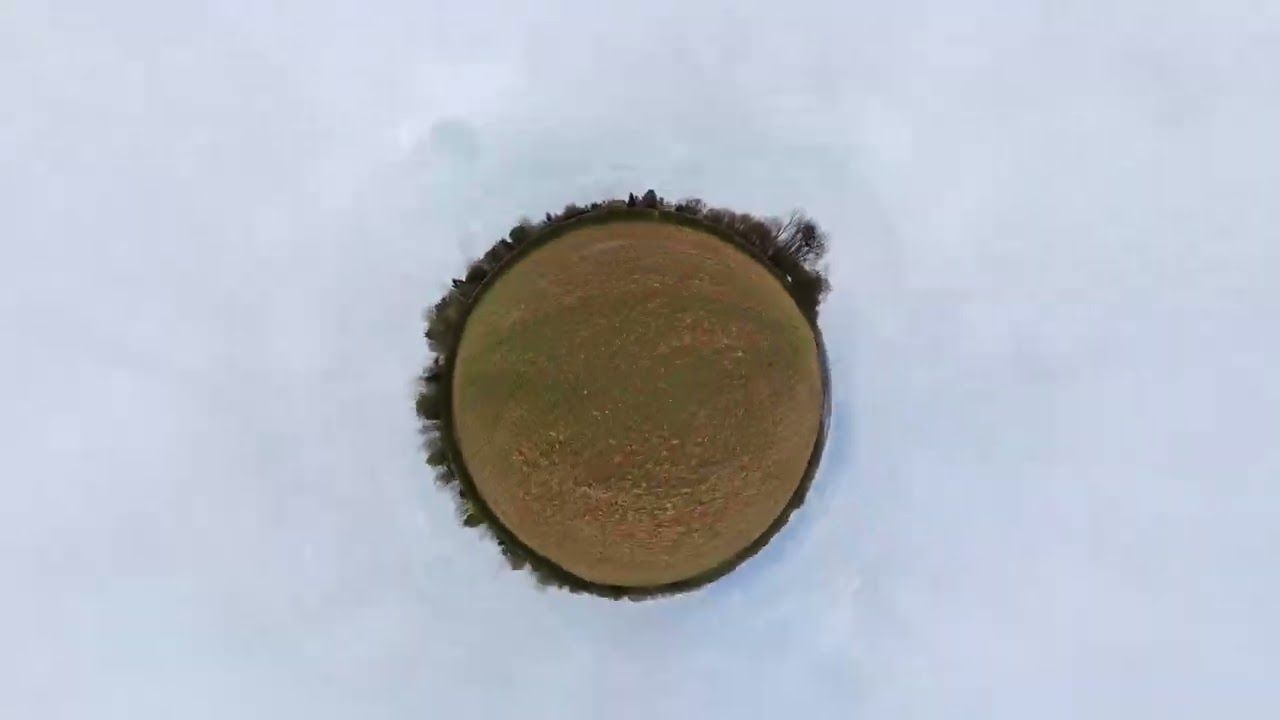
A full stretched-out image of the Avata 360's wide field of view
When you put this footage into specialised software like DJI Studio, you’re presented with a wide-angle wall of warped imagery that you can scroll around and zoom into using the mouse on a laptop computer or your finger on a phone if using the DJI Fly app. It’s like spinning a world globe, only you’re on the inside.
In essence, once you’ve found a specific aerial scene you like, you can flatten the image so it looks like an ordinary drone shot and then use a series of keyframes to change perspective from a myriad of angles, just by scrolling across the screen and choosing the best vantage point.
I should point out that the Avata 360 can also be used in single-lens mode, which produces flattish 4K footage almost on par with the DJI Mini 5 Pro. However, because this drone doesn’t have a 3-axis mechanical gimbal, the horizon in single-camera mode tilts left and right as the drone moves around, just like an FPV drone. Bear this in mind in case you want to use it like a conventional drone.
Another brilliant facet of this drone is the way it can accurately replicate FPV footage, especially after you’ve spent some time key-framing the footage in post-production. For this effect, you can use either the RC hand controller or, better still, the optional Goggles N3 and RC Motion controller.

Take the classic diving-down-a-waterfall FPV shot, for instance. With an FPV drone, the pilot has to fly to the edge and execute an acrobatic half-roll and half-loop to enter a vertical dive. This is followed by setting the throttle to zero and using micro-adjustments on the controls to steer it down while the chaos of air currents threatens to pull the drone into the falling water.
It is one of the most difficult and disaster-courting manoeuvres in drone-land, but when well executed, the pilot gets a million Hail Marys on his or her social media feed. Job done.
Conversely, with the Avata 360, you simply engage Sport mode, hover while you get your bearings (try that with an FPV drone in manual mode) and bring the drone downwards before following the flow of water along the river. The Avata 360 doesn’t physically dive nose-first; instead, it drops down in its usual horizontal flying position.
However, because the two cameras are capturing everything around the drone, you can select the best shots in post production (whether viewing the scene from above or below the cameras) and, if necessary, speed up the footage and add motion blur to make it look like you’ve skilfully dived down the waterfall at 50mph. It’s shots like these that could feasibly spell the end of the conventional single-camera FPV drone as we know it and kick-start a whole new slew of 360 drones.

The Avata 360’s multitude of FPV-style uses doesn’t stop here because it also comes with an Easy ACRO mode, which can only be experienced when using goggles and the Motion controller. If you’ve ever tried flying an FPV drone in manual ACRO mode, you’ll know how impossible it is to get a handle on.
Well, Easy ACRO perfectly replicates the action of an FPV drone doing aerobatics, in some cases without actually performing any physical aerobatics itself. Instead, for some of the tricks it uses the dual cameras and nifty software manipulation to recreate the visual effect of the drone performing a selection of preset trick moves in real time: Slide, 180 Drift, Flip and Juke Roll, which is a mid-air flip from front facing to backwards. You should try them, it’s fun.
My personal favourite feature on the Avata 360 is Head Tracking mode. When wearing the Goggles N3 and using the RC Motion 3 controller, it’s like being in Metaverse, only everything you see is the real thing. As if standing in an air balloon basket, you can have the drone hover in one spot at your preferred altitude and simply look all around you.
It’s a brilliant feature for scanning an area or even flying over a dangerous glacier to see it close-up from the air by using the Motion controller’s zoom wheel. Magic. By the way, the Avata 360 also comes with the same selection of Quick Shots featured with most conventional DJI drones, plus all-important subject tracking.
If all of these amazing features tickle your fancy and you wish to explore the sensational and immersive joys of FPV-style flying, the DJI Avata 360 is about as good as it gets.
What’s not so great about the DJI Avata 360?

Make no mistake, the Avata 360 is a brilliant do-it-all camera drone that offers an endless amount of creative freedom, but I see it being more suited to social media creators, avid videographers, FPV fans or anyone adept at quickly learning how to operate new software.
If you already have a drone but rarely edit any of the clips it’s taken into a complete video or perhaps a casual camera phone user who just shoots family or holiday clips but always leaves them untouched in the phone’s photo library, the Avata 360 is probably not the drone for you, and you’d be much better served with a conventional model like the amazing DJI Flip.
As briefly explained above, the Avata 360 records an almost full sphere of imagery all at once, as if filmed using two fish-eye lenses that have been fused together. The trouble is, the footage it shoots has to be edited – or at the very least watched – using specialised software like DJI Studio because its OSV files are not recognised by normal editing platforms such as FinalCut Pro or Adobe Premiere, let alone any current photo library apps like Apple Photos or Google Photos.

DJI Studio editing in action
Since the 360 method of videography transfers the creativity process from flying the drone to editing the footage on a desktop, laptop or phone, when you get back home after capturing all your lovely clips you have to launch the DJI Studio app and sift through acres of spherical footage within a single clip, choose a specific camera angle and create a series of key frames to hold the angle in position.
In some instances, a single clip just five seconds long may require several keyframes to either hold the camera’s perspective throughout the clip or change it so the subject is being viewed from a different angle.
To say this process is complex, comes with a very steep learning curve and is extremely time-consuming, is an understatement. Put another way, I have been shooting and editing conventional drone footage – including a raft of presentation videos for the real estate industry – since the first DJI Phantom was launched and, while the Avata 360 is capable of generating sensational footage that swirls and dives like a Peregrine Falcon, the act of pulling it off successfully in the final edit requires a lot of pernickety fiddling and that can take a lot of time.
When I’m shooting with a conventional camera drone, I know exactly what kind of shots I want at that very moment, and I simply make two or three passes from slightly different angles using subtle stick control and a light touch on the camera’s gimbal wheel until I’m happy with what I’ve got in the can.
When I get home, I throw the universally compatible MOV or MP4 footage files into Final Cut – or any other editing app – edit the clips together, add a bit of colour grading, and the job’s done. I’d say the whole process of flying to a completed video edit using a conventional drone is nearly three times faster than when I’ve used the 360 method.
Although the resolution of the footage coming out of the Avata 360 is in a whopping 8K, when you flatten the imagery in DJI Studio and start selecting and zooming into specific perspectives, the resolution is reduced to 4K and even 1080p if zoomed in closer on a subject.
You won’t see any reduction in quality when the finished video is viewed on a phone or tablet, but you may notice some artefacts and a noticeable softening of the image when pixel-peeping on a desktop monitor.
Also, since 360 cameras stitch two half spheres together using software trickery, you might occasionally notice a wobbly, jelly-like band across the centre of the frame. DJI Studio comes with three stitching optimisation plug-ins that help smooth out some but not all stitching issues.
Another thing I’ve noticed when editing with DJI Studio is how processor-intensive the program is when editing a load of 8K footage. Although the file sizes don’t appear to be any larger than standard 4K files, my two-year-old MacBook Air M3 experienced some serious lagging issues, which made the clips I was viewing jerk across the screen.
And this anomaly suggests to me that you may require a very decent, up-to-date computer for the editing process. I also find DJI Studio quite glitchy when editing, with some annoying workflow anomalies.

Aside from the above-mentioned disadvantages, one of the most annoying things about the Avata 360 is its noise. And I mean a right old racket that’s so shrill it can be heard from around 150m away.
The reason for this is that its propellers are much smaller than, say, the DJI Mini 4 Pro, which can’t be heard at all beyond just 30 or 40m. If you don’t want to draw attention to yourself, this may not be the drone for you.
Now I know that there are quite a few negatives in this paragraph but, as an experienced drone flyer who has reviewed almost every model in DJI’s incredible fleet, I’m mindful that this unique and extremely capable model may be a tad too complex and the required editing process too long-winded for some casual users who may be overly flattered by the all-singing, all-dancing 360 moniker.
Hence, for newbie pilots and those who rarely edit their footage, I would instead consider one of DJI’s conventional drones, like the similarly-priced DJI Mini 5 Pro or the aforementioned DJI Flip.
Drone design and features
I’ll come straight to the point – DJI is unequivocally the world’s best consumer drone manufacturer and one of the leading lights in commercial drone production for agriculture, rescue and surveying. If anyone asks me which drone they should buy, I simply say ‘anything by DJI’.
Even if the Chinese behemoth is initially beaten out of the blocks by other manufacturers like Zero Zero with the HoverAir X1 or Antigravity’s A1, the sheer weight of DJI’s long-term expertise and immense marketing clout ensures that it always comes out on top. Well, here’s another one to add to its roster of remarkable sky machines.
The new Avata 360 is unlike any other DJI drone, and while it isn’t necessarily the most suitable model for some, it definitely deserves its own pigeon hole, mostly because it’s so different to anything else in the company’s fleet. Think cinewhoop-style FPV on steroids.

Instead of having a single front-mounted camera, this one has two vertical fish-eye cameras, and they point away from each other to capture a full sphere of imagery. These cameras are mounted to a single-axis gimbal, so all stabilisation is performed digitally. This also means that even when using single-lens mode, the footage shot will follow the craft's roll as it turns left or right.
The key takeaway here is that, unlike a conventional drone which requires the user to carefully compose a shot while the drone is in the air, with the Avata 360 you can roughly point its twin fish-eye cameras at a subject, hit record and when you get home watch the clip from a myriad of angles using DJI’s specialised DJI Studio editing software, which allows you to choose any perspective or camera angle you want for your final edited video.
The Avata 360 weighs in at 455g, and that means it requires a CAA Operator ID (for the owner/controller) and a Flyer ID for the pilot. At 246×199×55.5mm, the Avata 360 cannot be folded, so it won’t fit in a pocket, but thankfully, the Fly More Combo comes with a great shoulder bag.

Regarding its flight specs, the Avata 360 has a maximum speed of 27mph (43kmh) in Normal mode and a spritely 40mph (64kmh) in Sport mode, with a maximum flight distance of 8.3 miles (13.5km) and a flight time of 23 minutes per battery. It’s also good to fly in winds up to Level 5 (24mph/38kmh).
As a safety measure, the Avata 360’s four small props are encased in a tough cage that protects the drone in flight while also making it much safer to fly within the vicinity of people. It also comes with confidence-inspiring omnidirectional obstacle avoidance when flown in 360 mode – in single camera mode, it only has forward obstacle avoidance – and a precision Return to Home function.
Goggles N3 and RC Motion 3 controller
For those who wish to enjoy a full immersive in-flight experience or fancy flying the Avata 360 in true FPV-style, it is also available to purchase with DJI’s new Goggles N3 and RC Motion 3 controller (both models are also available separately).
Believe me, flying FPV-style while wearing goggles provides a whole new level of wow factor that’s akin to wearing a VR headset. It genuinely allows you to view the world as a bird sees it – while keeping your feet safely on the ground.
The Goggles N3 are the latest in the DJI lineup, and they don’t require any eye focus adjustment because there’s space on the inside to accommodate your reading glasses. Simply adjust the head strap with an integral battery for comfort and go flying. However, since my face is thin, I did find that the goggles pressed down on the bridge of my nose, which prevented me from wearing them for long periods of time.

I must add at this point that the law requires having a second person alongside as a spotter whenever flying a drone with goggles of any kind. Hence, I would think carefully about who you could call on to spend time watching the drone while you enjoy yourself flying it.
The best way to use the goggles is in conjunction with DJI’s clever Motion 3 Controller, though there is a learning curve attached to this, too. The Motion 3 steers the drone mostly by hand movement, though it is also equipped with a tiny joystick for up, down and lateral movement.
To use, push the mini thumb stick up, and the drone will ascend. Now gently pull the acceleration trigger, and the drone will move forward – a circular dot in the centre of the screen makes it very easy to aim the drone at a particular subject.
Likewise, to go left or right, just tilt your hand in the direction you want the drone to go. Finally, to lower the altitude, pull back on the joystick, and if you need to perform an emergency brake, tap the top orange button. You can also fly backwards with this controller by pushing forward on the trigger.
The Motion 3 Controller feels extremely comfortable in the hand, and all buttons and control sticks are well-positioned and differently textured so you can easily find them while wearing goggles.
Flight performance
As with absolutely every drone in the DJI roster, the Avata 360 is an unbridled joy to fly. Everything is butter smooth, reliable and confidence-inspiring.
Honestly, any nervousness you might feel when putting it on its accompanying launch pad evaporates the moment it lifts off. It’s also extremely fast and it swoops and dives like a dragonfly on steroids, making it a perfect drone for darting around obstacles, which is what FPV is all about.
Camera features and performance
As already mentioned, the Avata 360 comes with two cameras: one above and one below. When in standby mode, one lens points forward and the other to the rear. This is because the drone actually rests on the camera housing prior to take off.
However, as soon as it’s in the air, the lens mount swivels so its lenses are pointing up and down. Thankfully, DJI provides optional lenses that can be easily fitted by the user should either lens sustain damage in flight or on the ground.
The Avata 360’s dual cameras are equipped with a 1/1.1-inch square CMOS sensor in each, delivering crisp 8K spherical footage, even in very low-light conditions. Each f/1.9 lens has a super-wide 200˚ field of view with a 20˚ overlap between the two cameras, where the software stitches both half spheres together.
As a result, you may see some tell-tale signs of stitching which manifests itself as a wobble across the centre line. This anomaly is more noticeable when shooting a subject up close or occasionally when filming vertical objects like statues, buildings, etc.
In maximum 8K resolution mode, both cameras sport a variety of frame rates from 24fps to 60fps, while their 2.7K setting provides even faster frame rates of up to 120fps. Just remember that when you select a specific scene and flatten it in post-production, the resolution of the clip is reduced to 4K and 1080p if you’ve zoomed in closer.

The Avata 360 also comes with a simple Panoramic mode and a tranche of standard Quick Shots like Dronie, Helix, Circle, Boomerang, Rotate and Rocket. However, these Quick Shots aren’t available in single lens mode, at least not yet. For video and stills recording, the Avata 360 comes with an ample 42GB of onboard storage along with a sealed MicroSD card slot.
I’ve been very impressed with the footage from this little drone though I’m not sure it would replace my Mini 4 Pro anytime soon, and for a number of reasons. Firstly, the Avata 360 relies on electronic image stabilisation and its housing only has one axis, as opposed to the Mini 4 Pro which uses a mechanical three-axis gimbal for a rock-steady horizon even when the drone’s turning or battling against a cross wind.
Even in single-camera mode, the Avata 360’s footage rolls with the pitch of the drone, making the horizon tilt from side to side, which is great for FPV but not traditional cinematography. Also, I have found that the Avata 360’s images – specifically the outer edges of the frame when viewed on a large laptop or desktop computer – are less sharply detailed, especially when shot from higher altitudes.
In a nutshell, the Avata 360 is a specialised hybrid designed for speedy 360-degree capture to the tune of a Death Metal soundtrack, while the Mini 4 Pro, and others like it, are precision aerial tools designed for capturing languorous cinematic scenes to the sound of Chopin. Take your pick.
Verdict

The DJI Avata 360 is one of the most innovative FPV-style drones you can buy. It captures immersive 8K 360˚ video, allowing creators to reframe shots after filming for maximum flexibility while its robust cinewhoop-inspired design, obstacle sensing and intuitive controls make it great fun to fly. With prices ranging between £409–£829 depending on the bundle, this drone really is amazing value.
However, it may not suit everyone since 360 footage requires complex, time-consuming editing and up-to-date hardware, while the final reframed video can be less sharp than a traditional camera drone and occasionally spoiled by poor image stitching.
