As something that affects nearly all of us at some point in our lives, lower back pain can cause significant issues in our daily lives. Although it can be caused by many different things, common origins include: poor posture when sitting, running for extended periods without stretching and sporting injuries that go untreated.
The lower back contains the most flexible part of the spine (the lumbar region) which makes it easy to slip into bad postural habits that exacerbate problems in this area. Repositioning into a healthier alignment can then cause tension which we feel the need to move out of, reinforcing our behaviour to retain the bad postural habits.
It’s important then to perform some simple yoga postures that can help alleviate pain and introduce better alignment in the body. These poses don't need any particular kit to practice, if you want to integrate them into your day regularly, it might be worth investing in one of the best yoga mats, or perhaps a pair of the best yoga pants.
Lower back pain isn’t all about the spine though, and as we’ll see in the postures listed below, much of the tension can be brought about through imbalances in the hips and legs, whether skeletal, muscular or both. If suffering from ongoing back pain it might be useful to look at core strengthening routines, such as pilates (unclear on the difference? Head to our yoga vs Pilates explainer). But because all lower back pain is different it’s really important you seek medical advice before practising any of the following postures.
Pose #1: standing forward bend
One of the causes of lower back pain is tightness in the hamstrings. A standing forward bend can help relieve tension felt in the lower back by addressing this tightness in the back of the legs. It’s a misconception that you need straight legs to stretch the hamstrings, so keep a bend in the knees to make this pose just as, if not more, effective.
Stand with your feet hip distance apart or wider. Inhale, lift the arms up overhead. Exhale, bend your knees and fold forward, placing your hands onto your shins. Alternatively, you can place your hands on yoga blocks if this feels more comfortable.
In this position, begin to spread your toes and press your feet down into the floor, keeping the knees bent. As you take deep breaths, imagine your sit bones sliding up towards the ceiling, opening the back of your legs. Continue doing this for a minute. Remember, be gentle in this pose and take things slowly for better results.
Pose #2: cross-legged forward bend
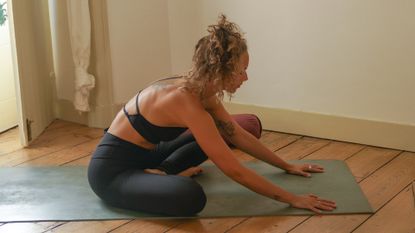
Another cause of lower back pain is tightness around the hips. The cross-legged forward bend offers a stretch to the outer hips which can help loosen the lower back. You won't need to go far into this stretch to feel it in the hips. It’s a slightly more advanced pose, so aim to do this towards the end of your practise.
Come to sit in a cross-legged position, preferably with your ankles underneath your knees. If you find this uncomfortable on any part of your body, including the knees, sit yourself on a few cushions until you feel able to hold this position.
Take a deep breath in and as you exhale fold from the hips, walking your hands forward along the floor. Don’t be discouraged if you’re not able to fold deeply. It doesn’t matter how far you bend, as long as you feel a stretch in the outer hips.
Extra tip: To bring a little massage into this, you can gently snake your spine from side-to-side as you fold forwards.
Pose #3: single leg twist
This is a compound movement stretching both the outer hips and the outer legs. It combines the essence of the previous two postures by stretching the back of the legs and opening up the hips which can help free up the lower body.
For this posture, it can help to use a belt wrapped around the sole of your raised foot. Lay on your back, bring the legs together and press out through both heels. Inhale, lift the right leg up with the belt looped around the right foot and held in the left hand.
The right arm should now extend out from the shoulder in a half T-shape. With your exhale, bring the right leg over to the left side, rolling all the way onto the left outer hip. Your left foot also turns to the left, allowing your little toe to touch the floor. As an optional added stretch, and if you feel comfortable doing so, look towards your right shoulder to complete the twist through the spine.
When in the twist, you may wish to move your hips toward the right-side of the mat to increase the sensation in the right outer hip. It’s important to keep your right foot active by pressing out through your right heel. Repeat this on the other side.
Extra tip: When in the twist, think about moving your hip away from your shoulder. For example, if the right leg is twisting over to the left, aim to push your right hip down towards your left foot.
More paras
Hawk


